
highlander
New member
So I spent a few minutes studying the shock and linkage area before beginning and though I wasn't sure how it'd pan out I went ahead with a plan to replace the shock without having to remove the linkage entirely or the exhaust. Removing the exhaust would have made this much easier but I didn't have new header washers and wanted to get this done today.
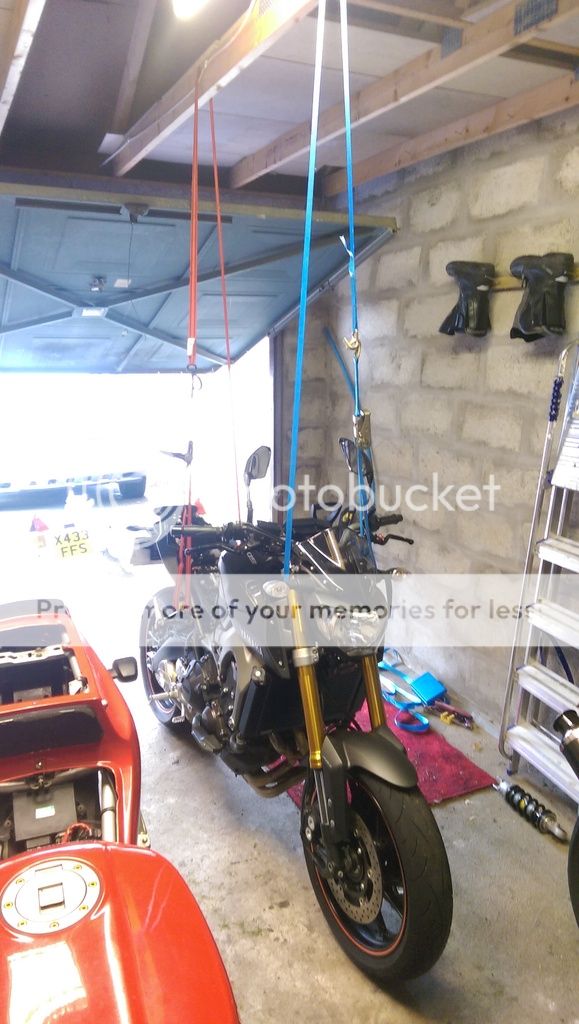
So firstly I secured the front and back of the bike with ratchet straps over a garage joist: front under the headstock, rear through the main pillion footrest triangle (yes the picture is after the K-Tech is in place). Ratchet both ends up to leave the front touching the floor and the rear a couple inches in the air. The front isn't strictly necessary but it's a safeguard in case the rear releases.
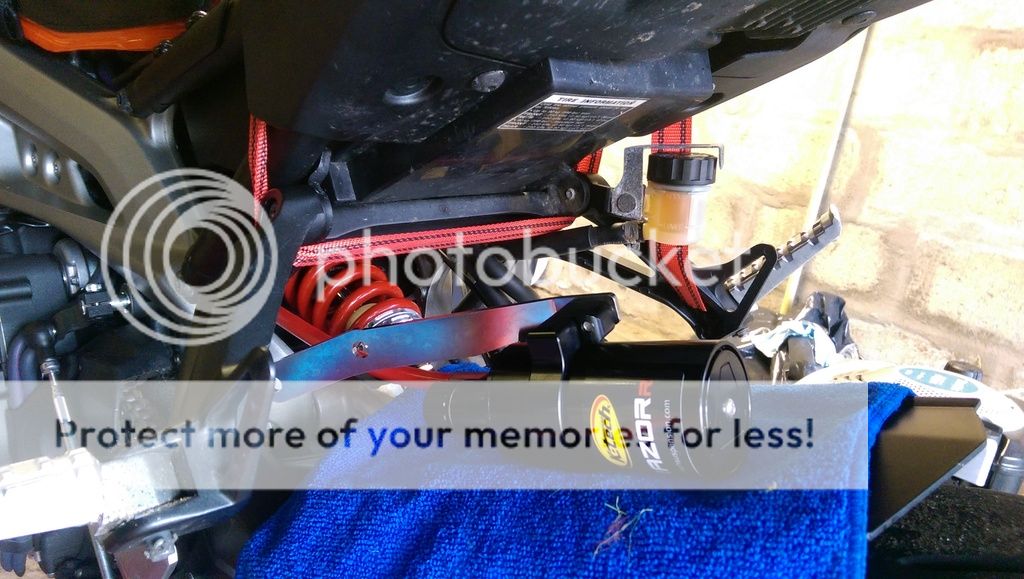
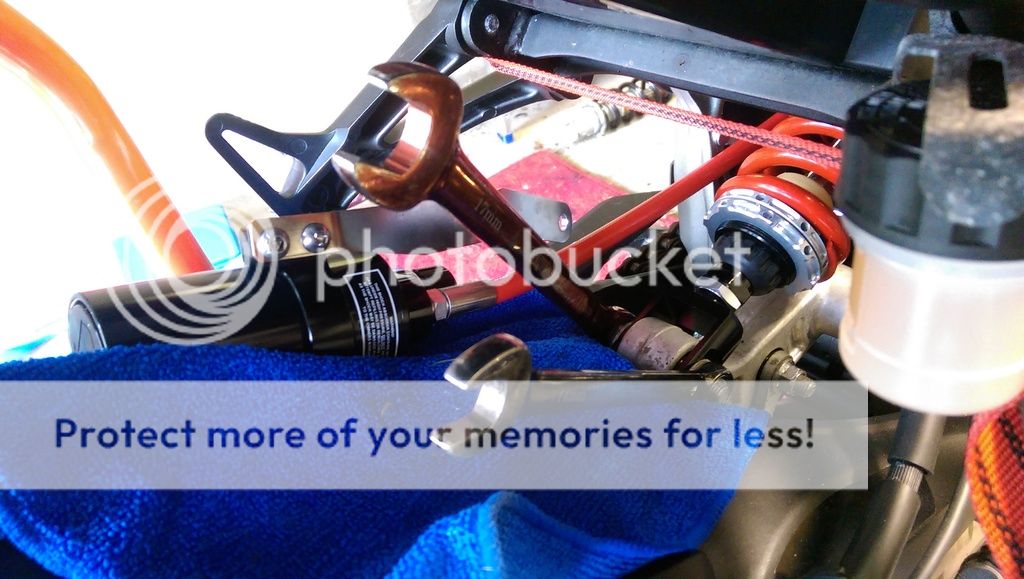
I saw the lower shock mount bolt is impossible to get at with the shock in place (with my basic tools) so I knew I'd have to remove one of the dog bone bolts to make the lower end of the shock accessible. I went with the following
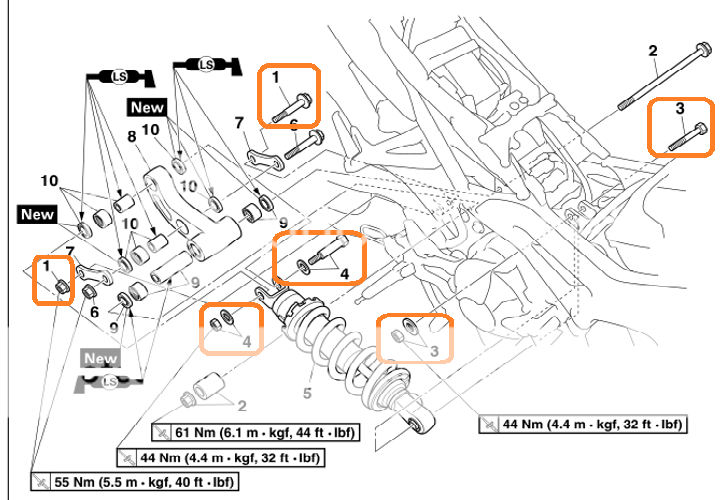
1. remove upper shock nut, washer and bolt (3)
2. remove lower dog bone nut and bolt (1)
3. Let the swingarm drop, it rests on the exhaust but it does expose enough of the lower shock mount nut to get a spanner in there. If you have a stubby ring ratchet wrench then you might not need to drop it but getting enough force with a stubby might be difficult. Again dropping the exhaust at the start would get this right out of the way and make life much easier.
4. remove the lower shock mount nut and bolt (4), pull out the old shock
Note the bolts came out easily with the rear end weight off the floor and the shock extended. Without the hanging joist method this would have been more difficult
5. Before we put the new shock in action make sure you're happy with initial settings and that the eye and clevice at each end line up. I have my preload in the middle and default compression and rebound setting as in the manual. I should strictly have compared the length of both new and old shock but I didn't so not 100% sure I haven't fractionally jacked up/down the rear.
6. lay new shock in position to ensure orientation is good, loosely bolt in the lower mount bolt at the clevice.
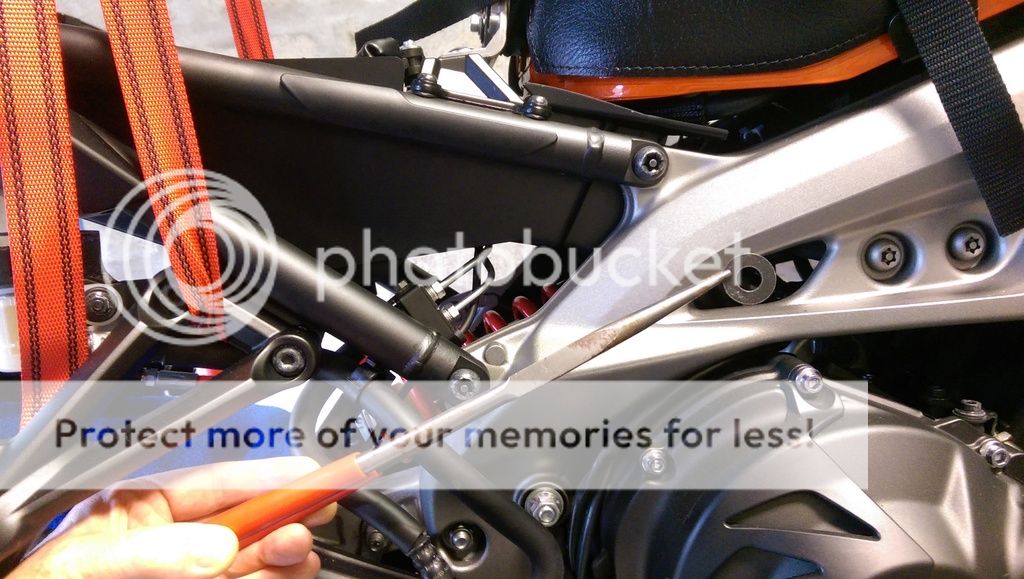
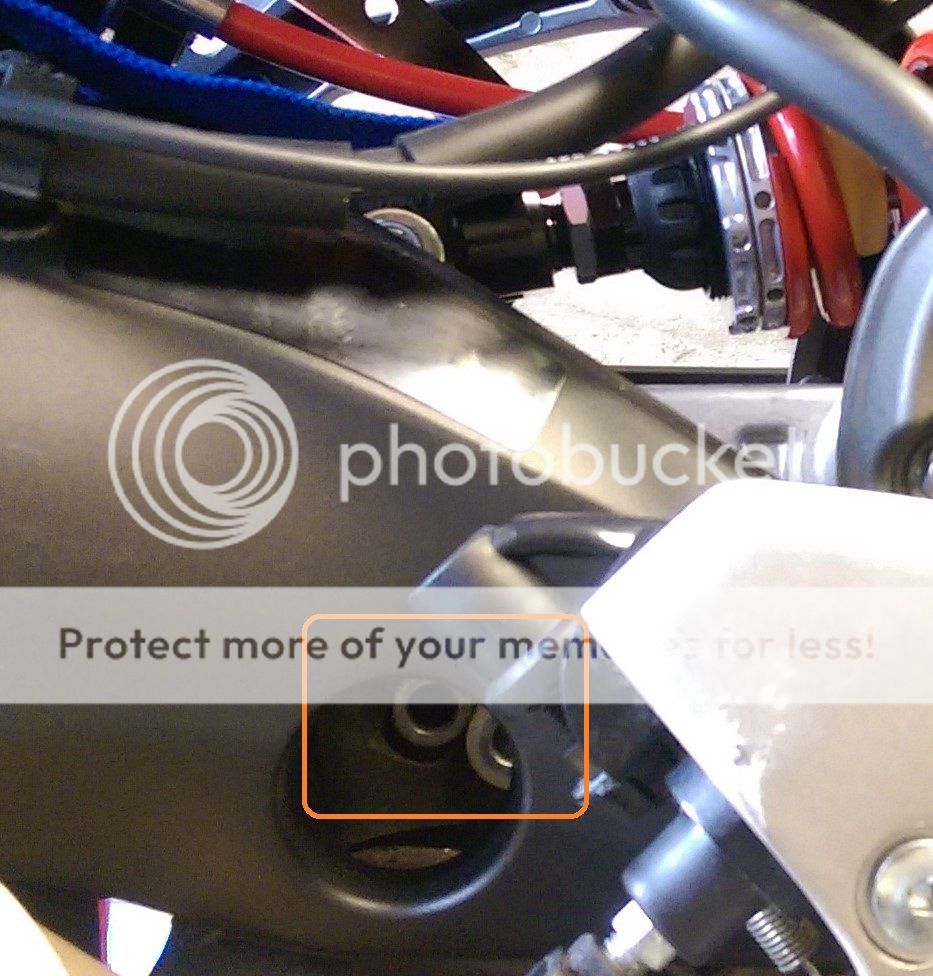
7. put in bolt to upper shock mount. The bolt head has a flat against an edge so you don't need to hold the bolt to torque the nut here. The washer could be a pain but I have a long pliers set (straight, 45 degrees & 90 degrees) which is dead handy for getting at awkward stuff sometimes, especially connector blocks. Like a vet I reached in from the back end and held the washer in place while I pushed it on with the extension bar through the access hole. In the picture everything is camera side of the frame to show where this is going to go - the access hole is where the washer is, behind the two frame bolts.
8. I go back to lower mounting bolt - I couldn't get a torque wrench in to the lower mounting bolt so had to just tighten that up bit by bit with 17 and 14 spanners until it was as solid as I could get it.
9. again the wonder of the ratchet comes in to play - I adjust the ratchet length until the lower dogbone lines up looking in on the right side using a screwdriver to centre it. I put a spare short bolt in the right side to hold it in place, go around to the left side of the bike and put the real bolt through pushing the short one out.
10. torque it all up. Ratchets straps off
11. lift and fit the remote reservoir, thankfully a good fit and no mods required.
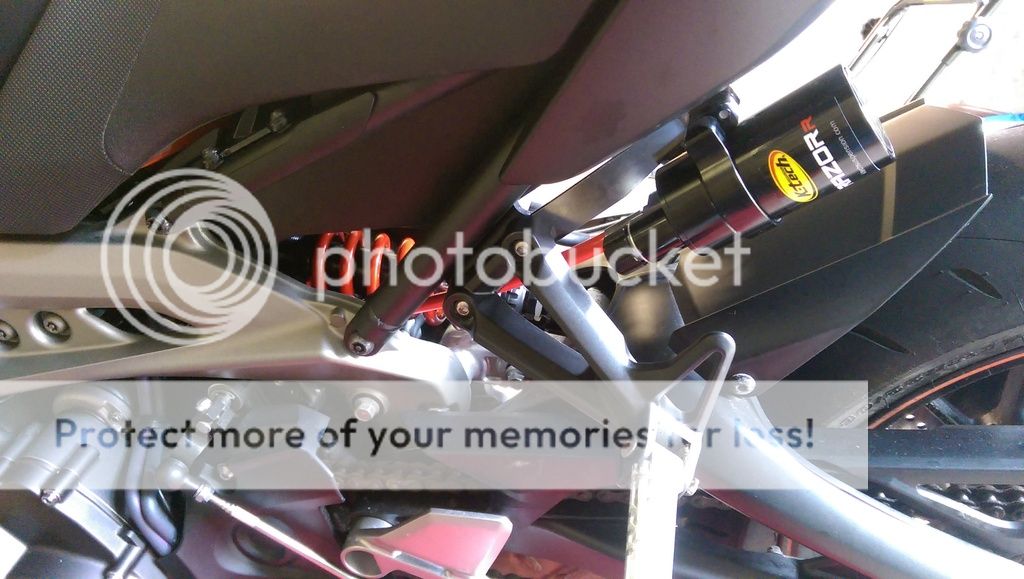
12. stand back and admire the p*rn.
Go back in side, boots off, wash up, open a beer.... and find this at the front door
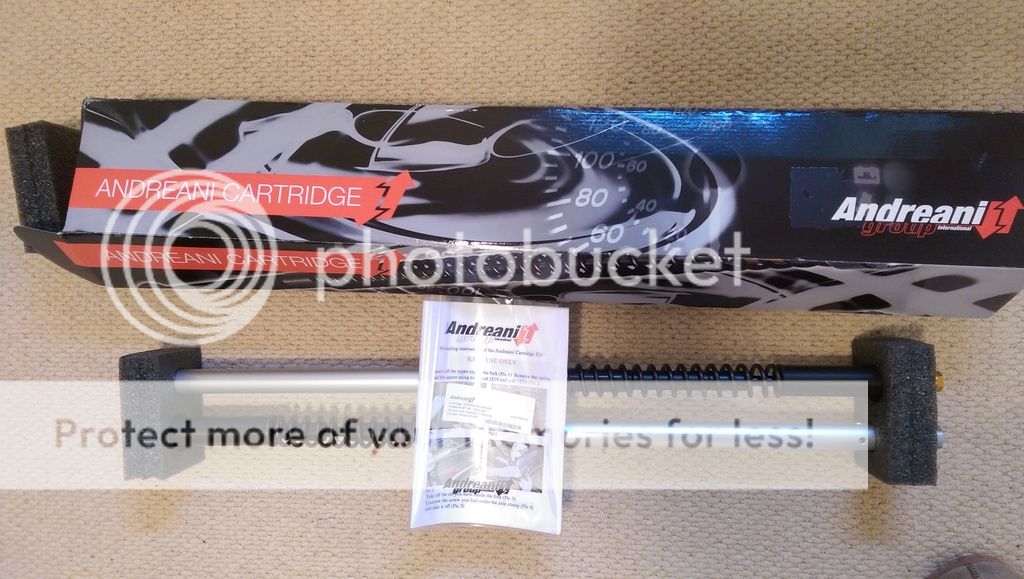
Boots back on ...
So firstly I secured the front and back of the bike with ratchet straps over a garage joist: front under the headstock, rear through the main pillion footrest triangle (yes the picture is after the K-Tech is in place). Ratchet both ends up to leave the front touching the floor and the rear a couple inches in the air. The front isn't strictly necessary but it's a safeguard in case the rear releases.
I saw the lower shock mount bolt is impossible to get at with the shock in place (with my basic tools) so I knew I'd have to remove one of the dog bone bolts to make the lower end of the shock accessible. I went with the following
1. remove upper shock nut, washer and bolt (3)
2. remove lower dog bone nut and bolt (1)
3. Let the swingarm drop, it rests on the exhaust but it does expose enough of the lower shock mount nut to get a spanner in there. If you have a stubby ring ratchet wrench then you might not need to drop it but getting enough force with a stubby might be difficult. Again dropping the exhaust at the start would get this right out of the way and make life much easier.
4. remove the lower shock mount nut and bolt (4), pull out the old shock
Note the bolts came out easily with the rear end weight off the floor and the shock extended. Without the hanging joist method this would have been more difficult
5. Before we put the new shock in action make sure you're happy with initial settings and that the eye and clevice at each end line up. I have my preload in the middle and default compression and rebound setting as in the manual. I should strictly have compared the length of both new and old shock but I didn't so not 100% sure I haven't fractionally jacked up/down the rear.
6. lay new shock in position to ensure orientation is good, loosely bolt in the lower mount bolt at the clevice.
7. put in bolt to upper shock mount. The bolt head has a flat against an edge so you don't need to hold the bolt to torque the nut here. The washer could be a pain but I have a long pliers set (straight, 45 degrees & 90 degrees) which is dead handy for getting at awkward stuff sometimes, especially connector blocks. Like a vet I reached in from the back end and held the washer in place while I pushed it on with the extension bar through the access hole. In the picture everything is camera side of the frame to show where this is going to go - the access hole is where the washer is, behind the two frame bolts.
8. I go back to lower mounting bolt - I couldn't get a torque wrench in to the lower mounting bolt so had to just tighten that up bit by bit with 17 and 14 spanners until it was as solid as I could get it.
9. again the wonder of the ratchet comes in to play - I adjust the ratchet length until the lower dogbone lines up looking in on the right side using a screwdriver to centre it. I put a spare short bolt in the right side to hold it in place, go around to the left side of the bike and put the real bolt through pushing the short one out.
10. torque it all up. Ratchets straps off
11. lift and fit the remote reservoir, thankfully a good fit and no mods required.
12. stand back and admire the p*rn.
Go back in side, boots off, wash up, open a beer.... and find this at the front door
Boots back on ...
")
