HOWTO: Install your own USB charger, controlled by ignition - Part 1


Stripy

New member
Joined
Sep 28, 2013
Messages
706
Reaction score
0
Points
0
Location
Manchester UK
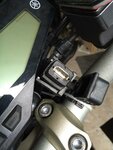
I have installed a USB charger on the handlebars, handy for keeping power to the phone, camera, GPS etc..
IMG_1282.jpg
This particular one, i found on eBay, but i take that the original will also work (albeit, for a higher price..)

Many of the chargers you can find, do actually recommend you to attach directly to the battery. But why so? Wouldn't that drain the battery?
Maybe not, as some models do have a diode installed after the fuse, that cuts off, when the power goes below 12.2V

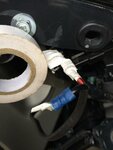
Well, easy peasy - my method involves connecting it to the AUX port on RH side, so it is already switched and fused. Simples :)

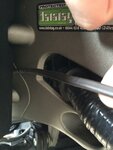
Take right hand cover off, loosen the allen bolt on left hand side(it's a size 4mm), IMG_1283.jpg
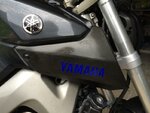
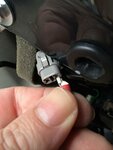
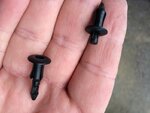
and take out the two plastic locks on the "inside" of the fake air intakes (You'll soon see why i call them fake...)
IMG_1284.jpg
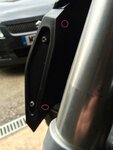
You take them out, by pushing the middle bit in, then you can remove the whole "plug" with your fingernails.
IMG_1285.jpg
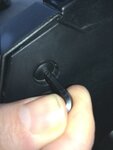
It will feel very tight, as there is something holding against - but there is only a guide in a rubber hole, making the resistance, so you will have to use a bit of force, to get the power off. It is this title devil that causes this:
IMG_1288.jpg

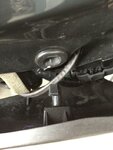
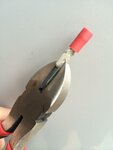
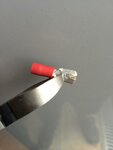
In here behind the bracket, you'll find an end of a wire, looking like this:
 
Last edited:

Stripy

New member
Joined
Sep 28, 2013
Messages
706
Reaction score
0
Points
0
Location
Manchester UK
HOWTO: Install your own USB charger, controlled by ignition - Part 2

Take the plug-hat off, and you have now got access to 12V, 2A switched power supply. Nice - just what we need!

As the plugs is hard (read: impossible) to find in Europe, you can make your own "connector" very cheaply. And i do mean very cheap :)

Alter two pins from your wire plug set:
IMG_1290.jpgIMG_1291.jpgIMG_1292.jpg

The width should only be 2.3mm in order to go into the socket, so test if it fits, adjust accordingly:
IMG_1293.jpg

All good for both homemade pins?
Crimp on to wires - i used a blue and a red. Blue for ground (12V-), red for live (12V+)
The connector's wire from the wire loom, black is ground, yellow/brown is live

IMG_1294.jpg

Now go test if your newly installed USB socket works, when you turn the key to on :)
 

Stripy

New member
Joined
Sep 28, 2013
Messages
706
Reaction score
0
Points
0
Location
Manchester UK
HOWTO: Install your own USB charger, controlled by ignition - Part 3

All good? :)
I thought so :D
Where to put the cable?
Different ways, i've gone in from the rear side of the cover, meaning up against the frame - lots of space to go in.
Please have in mind, this is only a temporary solution for me, so feel free to select your own way into the connector :)
IMG_1297.jpg

Now, as this is a very cheap way of doing it, without getting the proper male connector, i've used some isolation tape to both secure the wires stays in place and also protect the connection just a little bit, should the weather get inside:
IMG_1295.jpg

Now is just a question of assembling.
Put the cover back on, again a little force might be needed to push the bracket through its rubber mount.

The two pins is easy - push the centre bit back out, so it is about 4-5mm out over the top (the one on the upper right is how you want it to be, before installing):
IMG_1298.jpg

once in the hole, just gently push with your finger til it clicks.
Fasten allenbolt.

Job done!
 

stevecbr

Member
Joined
Oct 13, 2013
Messages
982
Reaction score
10
Points
18
Location
Norwich, Norfolk, United Kingdom
Excellent, have been looking to do that myself, but couldnt find the plug to go into the aux socket, and didnt want to wire directly to battery. Your idea looks like it fits well, and is cheap. Do you have link to ebay seller for aux socket?
 

Stripy

New member
Joined
Sep 28, 2013
Messages
706
Reaction score
0
Points
0
Location
Manchester UK

relz

New member
Joined
Jan 16, 2014
Messages
298
Reaction score
0
Points
0
Location
Israel
Take the plug-hat off, and you have now got access to 12V, 2A switched power supply. Nice - just what we need!

As the plugs is hard (read: impossible) to find in Europe, you can make your own "connector" very cheaply. And i do mean very cheap :)

Alter two pins from your wire plug set:
View attachment 1220View attachment 1221View attachment 1222

The width should only be 2.3mm in order to go into the socket, so test if it fits, adjust accordingly:
View attachment 1223

All good for both homemade pins?
Crimp on to wires - i used a blue and a red. Blue for ground (12V-), red for live (12V+)
The connector's wire from the wire loom, black is ground, yellow/brown is live

View attachment 1224

Now go test if your newly installed USB socket works, when you turn the key to on :)

Thanks for the detailed write-up, it will come in handy when I get around to doing mine.
I actually spent a little more money and bought the connector from the US, from a company called cycleterminal, it's the Sumitomo MT Connector Item # Male MT090-2.
It is a bit annoying that the shipping cost more than the part itself... but I didn't know where else to find them.

I read about it in our sister forum across the pond.
 

W8ENN

New member
Joined
Nov 22, 2013
Messages
175
Reaction score
0
Points
0
Location
Australia
I went down the cycle terminal route I'm a bit OCD when it comes to things like this. Works a treat
 

Locksmith

Member
Joined
Apr 6, 2014
Messages
462
Reaction score
2
Points
18
Location
Kent
Just fitted a Sat-Nav using this method, very pleased!
 

Locksmith

Member
Joined
Apr 6, 2014
Messages
462
Reaction score
2
Points
18
Location
Kent
That's it the white one on the left, though if you could just get the actual metal inserts, that's all you need as the top piece is already there.
 

Twozup

New member
Joined
Nov 22, 2013
Messages
1,108
Reaction score
1
Points
0
Location
West Coast Scotlandshire
Just had a look your right the white plug in is there just needs the connectors. Thanks lock


Sent from my mind using my fingers
 

lee1980

New member
Joined
Dec 6, 2014
Messages
370
Reaction score
1
Points
0
Location
Bristol, UK
Did anyone source these in uk/Europe? If got female plug on right in pic shouldn't I be able to add what ever led light, charge etc to that then plug it directly to socket on bike?

Are part numbers meaning mt 09 or Is it just coincidence same part number as our bike?
 

R6owdlad

Member
Joined
Aug 28, 2014
Messages
171
Reaction score
0
Points
16
Location
Clitheroe Lancs UK
Did anyone source these in uk/Europe? If got female plug on right in pic shouldn't I be able to add what ever led light, charge etc to that then plug it directly to socket on bike?

Are part numbers meaning mt 09 or Is it just coincidence same part number as our bike?

Did you get anywhere with this plug?
 

lee1980

New member
Joined
Dec 6, 2014
Messages
370
Reaction score
1
Points
0
Location
Bristol, UK
No I haven't sorry still on my todo list, I was hoping if got right female part I could Simply plug in stuff and not change anything on bike, I still haven't taken off side panels on tank to locate socket on bike.
 

R6owdlad

Member
Joined
Aug 28, 2014
Messages
171
Reaction score
0
Points
16
Location
Clitheroe Lancs UK
No I haven't sorry still on my todo list, I was hoping if got right female part I could Simply plug in stuff and not change anything on bike, I still haven't taken off side panels on tank to locate socket on bike.
I found the socket-it's well hidden away so you'll have to do a lot of fishing to find it!
I've had a price of £35 from a dealer for this connector which I think seems a bit steep so I'm browsing to see if there is anything else that will work. I haven't actually seen what you get for £35 but am calling in to the dealership on Saturday so will see if they have one I can look at.
Am sure there must be something a lot cheaper lol
 

lee1980

New member
Joined
Dec 6, 2014
Messages
370
Reaction score
1
Points
0
Location
Bristol, UK
I see will need to wait until can have a good look, might be this they tryna sell you which just goes direct to battery. in the thread above its possible to just get the connector metal bits and stick in socket, I just wanted to be able to plug it and removed etc, cant be that expensive to get, maybe buy a lot if one of does an order.

Yamaha MT-09 12V DC Outlet 1RC-F254B-00-00


Top