
Yamaha LED blinkers
- Thread starter MadGelo
- Start date
Do the job properly.As far as I can see, they want you to attach resistors to the frame (I assume to keep them cooled).
Is it important? as there is nowhere to really attach them under the seat.
") Throw the resistors away and buy a replacement indicator relay (click here). and you want the "OEM Block type".
Throw the resistors away and buy a replacement indicator relay (click here). and you want the "OEM Block type".It's plug & play and it's what I fitted to my bike. No complaints.
Last edited:
Put the resistors in your seat and they'll keep your butt warm in the winterThey came with the blinkers....dont wanna spend more money
Good spot, Spot !!Do the job properly.
It's plug & play and it's what I fitted to my bike. No complaints.
I know nothing about fitting LED blinkers but would prefer the plug and play method.
Wonder why Yamaha don't include that in the kit?
Is it really as easy as just plugging the relay in? May well go for the Yam blinkers as I like the look of them
Yes, fitting the relay is just plug and play.
The Yam blinkers come with bullet connections (why when the original item uses a block connector?) so I just cut into the wires at a suitable point to put in the female bullet connectors with the OEM block at the other end (going into the relay).
The bullet connectors supplied are a bit cheap and nasty so I used some better quality heavy duty items I had lurking in my garage.
Then just unplug the OEM relay, slide it off the retaining post, take off the rubber ring that allows it to sit on the post and put it on the new relay. Slide the new relay back on the post, plug in the block connector and you're in business!
Sounds more complicated written down than it is. I'll take a photo of it later so you can see.
I found the hardest part of fitting the indicators was when replacing the front ones. They come with 2 blanking plates for each side. One for the inside and one for the outside of the headlamp housing and I fiddled about far too long trying to get the fuckers to stay in place and then not move when I tightened them up.
With hindsight I reckon I should've tacked them in place with a tiny dab of superglue to stop them moving around.
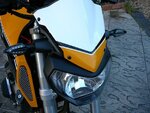
Red arrow in pic below shows one of the external blanking plates.
Reckon the LEDs look far nicer than the originals.
The Yam blinkers come with bullet connections (why when the original item uses a block connector?) so I just cut into the wires at a suitable point to put in the female bullet connectors with the OEM block at the other end (going into the relay).
The bullet connectors supplied are a bit cheap and nasty so I used some better quality heavy duty items I had lurking in my garage.
Then just unplug the OEM relay, slide it off the retaining post, take off the rubber ring that allows it to sit on the post and put it on the new relay. Slide the new relay back on the post, plug in the block connector and you're in business!
Sounds more complicated written down than it is. I'll take a photo of it later so you can see.
I found the hardest part of fitting the indicators was when replacing the front ones. They come with 2 blanking plates for each side. One for the inside and one for the outside of the headlamp housing and I fiddled about far too long trying to get the fuckers to stay in place and then not move when I tightened them up.
With hindsight I reckon I should've tacked them in place with a tiny dab of superglue to stop them moving around.
Red arrow in pic below shows one of the external blanking plates.
Reckon the LEDs look far nicer than the originals.
Yeah I had that issue too with the blanking plates - couldnt work out if I was doing it right as it didnt seem to make sense.Yes, fitting the relay is just plug and play.
The Yam blinkers come with bullet connections (why when the original item uses a block connector?) so I just cut into the wires at a suitable point to put in the female bullet connectors with the OEM block at the other end (going into the relay).
The bullet connectors supplied are a bit cheap and nasty so I used some better quality heavy duty items I had lurking in my garage.
Then just unplug the OEM relay, slide it off the retaining post, take off the rubber ring that allows it to sit on the post and put it on the new relay. Slide the new relay back on the post, plug in the block connector and you're in business!
Sounds more complicated written down than it is. I'll take a photo of it later so you can see.
I found the hardest part of fitting the indicators was when replacing the front ones. They come with 2 blanking plates for each side. One for the inside and one for the outside of the headlamp housing and I fiddled about far too long trying to get the fuckers to stay in place and then not move when I tightened them up.
With hindsight I reckon I should've tacked them in place with a tiny dab of superglue to stop them moving around.
Red arrow in pic below shows one of the external blanking plates.
Reckon the LEDs look far nicer than the originals.
View attachment 1904
They look really good and much brighter than stock which was surprising.
I remember back in the day, fitting small indicators to my 600 Fazer. You had to use a couple of adaptor plates sandwiching the original mounting hole.
Thinking about it's even more bizarre Yamaha supplying supposedly made for your machine parts when in fact they are as generic as can be
Look good though, are they the black ones?
Thinking about it's even more bizarre Yamaha supplying supposedly made for your machine parts when in fact they are as generic as can be
Look good though, are they the black ones?
Yes, last time I buy any Yamaha accessories. Cost a lot and dont even fit right. ffsI remember back in the day, fitting small indicators to my 600 Fazer. You had to use a couple of adaptor plates sandwiching the original mounting hole.
Thinking about it's even more bizarre Yamaha supplying supposedly made for your machine parts when in fact they are as generic as can be
Look good though, are they the black ones?